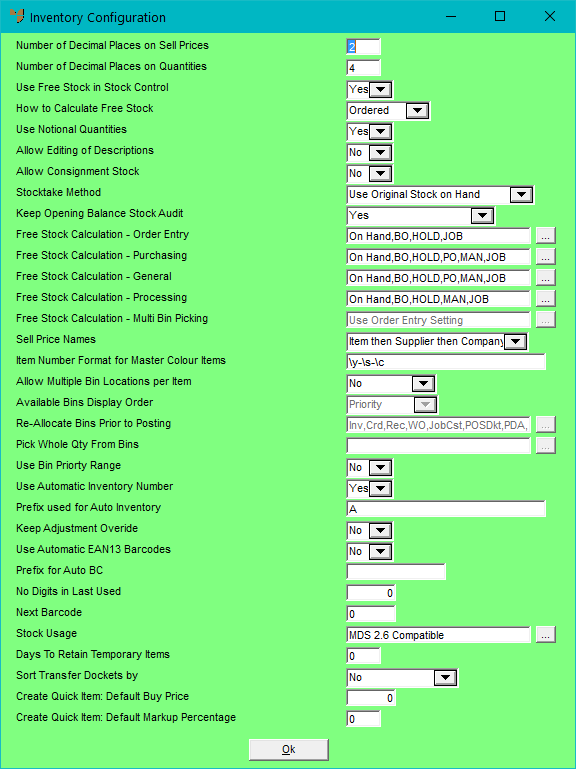
You use the Inventory Configuration screen to select your inventory settings such as how free stock is calculated, whether consignment transfers are allowed, your default stocktake method, and whether multiple bins are used.
Refer to "Selecting a Company to Edit"
Micronet displays the Inventory Configuration screen.
|
|
Field |
Value |
|---|---|---|
|
|
Number of Decimal Places on Sell Prices |
Enter the number of desired decimal places (2-6) in your selling prices. |
|
|
Number of Decimal Places on Quantities |
Enter the number of decimal places (2-6) for your item quantities. |
|
|

|
Reference 2.8 Feature If you are using PDAs for paperless processes, you should also set the number of decimal places to be displayed on PDAs on the Micronet Mobile Picking screen / Edit Warehouse Mobile Settings screen (v2.8) – see "General Settings". |
|
|
Use Free Stock in Stock Control |
Select Yes if you want Micronet to use free stock rather than actual stock on hand for purchasing, overstock and understock calculations for reports and inquiries. |
|
|
How to Calculate Free Stock |
Select how Micronet should calculate free stock:
|
|
|
Use Notional Quantities |
Notional quantities are used where the sales quantity is different to the ordered quantity for orders - for example, for meat supplies where orders are in quantities and sales are in kilograms, etc. Select Yes if you want Micronet to use notional quantities, or No if you don't. |
|
|
Allow Editing of Descriptions |
Select Yes if users can override an item's description during order entry/invoicing time, or No if they can't. |
|
|
Allow Consignment Stock |
Consignment stock is goods you receive from a supplier but don't pay for until they are sold to a customer. Select Yes if you want to enable consignment stock in Micronet, or No if you don't. Selecting Yes allows users to select an item as consignment stock when they are processing an invoice or credit note. |
|
|
Stocktake Method |
Select your default method of stocktaking:
For more information about stocktake methods, see "Creating a New Stocktake Batch". |
|
|
Keep Opening the Balance Stock Audit |
This is normally set to Yes, however the calculation of the new month opening stock figure can slow the End of Month process and adds an extra record to your Product Movement Register audit file. Customers with very large inventory files (over 50,000 items) should check with their Micronet representative to evaluate the impact of this option on their system performance. |
|
|
Free Stock Calculation - Order Entry |
Micronet can calculate and display the free stock figures differently in various areas of your system by including or not including certain quantities as required. This is the free stock figure that Micronet displays during order entry. |
|
|
Free Stock Calculation - Purchasing |
This is the free stock figure that Micronet displays during the creation of purchase orders. |
|
|
Free Stock Calculation - General |
This is the free stock figure that Micronet displays during sales inquiries. |
|
|
Free Stock Calculation - Processing |
This is the free stock figure that Micronet displays during inventory adjustments. |
|
|
Free Stock Calculation - Multi Bin Picking |
This is the free stock figure that Micronet displays when a picking slip is sent for paperless picking. |
|
|
|
Reference To set the free stock calculation for any of the fields above, see "Editing the Free Stock Calculation Method". |
|
|
Sell Price Names |
Names of your selling prices 1-8 for Group 1 (wholesale) and Group 2 (retail) customers can be setup and stored either company wide (i.e. one set of sell price names for all items), category wide (i.e. one set of sell price names for each product category), against each supplier, or against each individual item. This field is related to the Sell Price Breaks field on the Invoicing Configuration screen – see "Edit - Program - Invoicing". Select the order in which you want Micronet to check and display the sell price names for items:
|
|
|
Item Number Format for Master Colour Items |
If you plan to use colour/size matrixes for managing products such as clothing, light fittings, etc., then you have to indicate to Micronet what the part number structure is going to be. This can be set as a system wide configuration or against each colour/size master item. The options are:
For example: \y text\c \p10\s will result in “MasterItemCodetextColourCode 00SizeCode”. The typical setup is: \y-\c-\s where y is the part number, c is the colour, and s is the size. For more details on using the colour/size matrix, refer to "File - Colour/Size Table". |
|
|
Allow Multiple Bin Locations per Item |
Select whether you want to enable multiple bins. Options are:
|
|
|

|
Technical Tip When switching on multi bin locations for the first time, Micronet does require a main bin location number to exist on the item file. Micronet prompts you to select or create your main bin location when you save your changes on the Change Existing Company screen. |
|
|
Available Bins Display Order |
If multiple bins has been enabled in the last field, select the order in which you want the bins displayed. Options are:
|
||||||||||
|
|
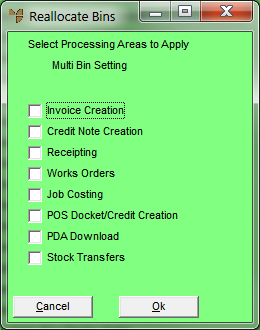
Re-Allocate Bins Prior to Posting |
If multiple bins are enabled in your Micronet system, use this field if you want Micronet to refresh the bin allocations on invoices, MJC orders, POS dockets, etc. before they are posted. This ensures that if stock levels in the allocated bin change during a delay in processing, Micronet re-allocates the order to the highest priority bin location. To select the transactions where you want Micronet to refresh the bin locations, select the browse button (...) next to this field. Micronet displays the Reallocate Bins screen.
Check the box for each transaction type where you want Micronet to refresh bin allocations, then select the Ok button. When a transaction of a selected type is posted, Micronet removes the allocated bin and selects a new bin based on the current system bin settings. |
||||||||||
|
|
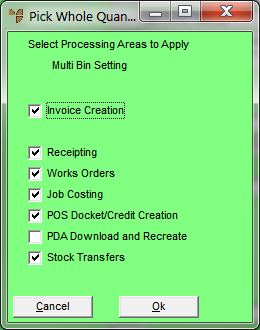
Pick Whole Qty From Bins |
2.8 Feature If multiple bins are enabled in your Micronet system, use this field if you want Micronet to allocate only whole quantities from/to bins. For example, say you have the following bin priorities and quantities:
To select the transactions where you want Micronet to allocate whole quantities, select the browse button (...) next to this field. Micronet displays the Allow Editing of Bin Locations screen.
Check the box for each transaction type where you want Micronet to allocate whole quantities only, then select the Ok button. |
|
|
|
Technical Tip If the Registry setting, AllApps\PickInBinQtyOrder, is set to 1, Micronet will pick stock in bin quantity order. That is, it will first to try to pick the whole quantity from a single bin. If that is not possible, it will allocate from the bin with the highest quantity first. |
|
|
Use Bin Priority Range |
2.8 Feature When multiple bins are enabled, you can set a picking priority and receipting priority per item via the Item Update screen - Purchasing tab – see "Enter Multiple Bin Locations". By contrast, setting this field to Yes allows you to set a picking priority and receipting priority per bin, rather than per item. Micronet then assigns bin priorities to items automatically when they are first picked or received, which can save a lot of setup time. |
|
|
|
Technical Tip Note that Allow Multiple Bin Locations per Item (above) must be set to an option other than No. You must set the Picking Priority and Receipting Priority on the Warehouse Bin Locations screen – see "File - Warehouse - Bins". And finally, before implementing this feature, you must run the resequencing program to set the bin priorities in the warehouse multi bin file – see "Bin Location Maintenance - Resequence Bin Locations". |
|
|
Use Automatic Inventory Number |
Select Yes if you want Micronet to generate automatic inventory numbers when you create new items, or No if you want to allocate inventory numbers manually. |
|
|
Prefix used for Auto Inventory |
If you selected Yes in the previous field, enter any prefix you want displayed before automatic inventory numbers. If you have a gift voucher payment type, your gift voucher numbers in Micronet must be at least five characters long (for more information, see "Edit Company - Edit - Payment Types".) If your gift vouchers numbers are smaller, you should enter a prefix in this field that will make the voucher numbers five digits long. For example, if gift voucher numbers are three digits, you might enter GV to produce gift voucher numbers GV001, GV002, etc. |
|
|
Keep Adjustment Override |
|
|
|
Use Automatic EAN13 Barcodes |
Select Yes if your company uses barcodes in EAN13 format. This only works with the specific EAN13 barcode font supplied by Micronet (ean-13.ttf). If an EAN13 barcode only has 12 characters, a check digit will be added. |
|
|
Prefix for Auto BC |
If you are using automatic EAN13 barcodes, enter any prefix you want displayed before those barcodes. |
|
|
No Digits in Last Used |
|
|
|
Next Barcode |
|
|
|
Stock Usage |
If you want to record item usage separately from item sales, see "Recording Stock Usage". |
|
|
Days to Retain Temporary Items |
2.8 Feature Temporary items are automatically deleted during MDS End of Month processing if the item's stock on hand is zero and there are no pending transactions (i.e. purchase orders). This field allows you to specify a minimum number of days that a temporary item must be idle before it can be deleted during EOM. If you don't want temporary items to be deleted, set this field to 999. |
|
|
|
Technical Tip
|
Micronet redisplays the Change Existing Company screen.
If you have enabled multi bins for the first time, Micronet displays the following message prompting you to select or create your main bin location.

Options are:
|
|
|
Technical Tip A stocktake should be performed to enter stock correctly into the relevant multiple bins. |
Refer to "Logging in With Updated Configuration (Method 1)" or "Logging In With Updated Configuration (Method 2)".